Showing posts with label Inktense. Show all posts

Wednesday, November 25, 2015

First Drawing Created in My New Studio!

Moving is always such a big deal...and finding everything when you unpack can be a nightmare. I've been in my new place for about 3 weeks and have FINALLY been able to start drawing in my new studio. I've missed it. Today I did a "warm-up" drawing, one of the views from around the farm I'm renting.

It's nice to be back!

“Farm View, Fall” Pen and ink and Inktense pencils
in a Stillman and Birn 6”x8” Zeta sketchbook.

Tuesday, July 10, 2012

Which are my favorite sketching tools right now?


Hands on hips, this was the question I asked myself the other day as I took stock of the many types of pencils, paints, markers, etc. that I saw lined up before me. For outdoor sketching adventures, I’ve created several small kits that I rotate through depending on what I’m feeling like that day. My three favorite sketch kits are 1. a small pen & ink and watercolor kit, 2. a small fast-sketch kit with various stumps and graphite pencils, and 3. a watercolor pencil/Neocolor II kit (my most recent favorite.)

I thought I might further refine my sketch kits further based on what tools I’m having fun using right now. But how best to check on the fun level for each tool? I decided to create a test of sorts for myself. I started by drawing a new coloring book page that I would then color with different tools. That would show me which tools would best fit my current needs. This also would also help me organize a new palette of colors for the kinds of outdoor places where I tend to sketch (horse farms, local NW scenes.)

It was a fun exercise.

Here is the line drawing I used. I photocopied the image several times onto heavy, white cover stock pages for my test.
A new pen & ink image to color.
Coloring page #1 - Tombow Dual Brush Pens and Pitt Design Pens (magic markers). I liked the look of this colored image. I thought it was very cute. I think that markers might give my sketching scenes something of an illustrative quality.
This image was colored with Tombow Dual Brush Pens and Pitt Design Pens.
Coloring page #2 - Neocolor II watersoluble crayons. I liked the look of this page too but there’s a problem with using crayons in the Summer…they melt in hot cars! Frequently, my sketch kit sits in the trunk of the car for hours until I get a moment to sketch.
This image was colored with Neocolor II crayons.
Coloring page #3 - Inktense watersoluble pencils. Inktense pencils are really cool for several reasons. The first is that their pencil leads are made of watersoluble ink. After the ink has been wet once it will never be watersoluble again. So you can build up your image without moving or changing the underlying layers. I find that the transparency of the Inktense colors also works especially well with pen & ink drawings. As another fun feature, the colors are extra bright.
This image was colored with Inktense watersoluble pencils.
Coloring page #4 - watercolor pencils (Cretacolor and Supracolor). These are the pencils that I have been using in one of current sketch kits. They are very user friendly, travel well, and lay down good color either dry or when wet with a waterbrush. Although the look isn’t as bright as with the Inktense pencils they are more versatile for many subjects.
This image was colored with Cretacolor and Supracolor watercolor pencils.
So which ones where the most FUN to use?

The results were an essential tie! I have to give the nod to both the Tombow/Pitt markers and the Cretacolor/Supracolor watercolor pencils. I think both will serve my needs very well and are very fun to use.
Evening update!

I have since created two new sketch kits – one with the markers and one with the colored pencils and I’ve bundled them together into the same little carry bag. Now I feel ready for all sorts of new adventures! Tally ho!

Sunday, May 13, 2012

American Road: Stories and Music


David reading about his bear encounter
Last night Matt and I went to an author-sponsored event at the EnlightenCafe in Ballard. It was an evening of music and stories on the subject of the American Road. An eclectic series of performances, the evening included banjo music, interpretive dance and readings by authors.

Of course, it gave me the perfect opportunity to sketch. I was experimenting with a series of waterbrushes filled with (1. Higgins Black Magic ink, 2. Noodler’s Blue Nose Bear, 3. plain water), a graphite pencil, and Inktense black pencil.

I was also wearing my new tan pants!

As David was reading about his experiences with a bear encounter while on a motorcycle trip, I managed to spill a few drops of Blue Nose Bear from the cap of my waterbrush onto my pants. Yikes! Funny thing as he had been repeating the word “bear” several times just before the spill. Subliminal suggestion? I wonder… ;-)

Maureen performed interpretive dance. She was dressed as a demon-girl.
The next semi-disaster appeared a few minutes later when I realized that my Ahab ink pen had leaked (!!! – bad pen!!) in my pen case! While cleaning it up I got Platinum Carbon Black ink all over my hands. (Fortunately not my clothes!) For a few minutes my hands looked like a coal miner’s! Carbon Black is harder to remove from your hands than many other inks. I still have some stains on my fingers this morning (the next day) to prove it. Argh!! Once cleaned up, my Ahab worked fine though. I have no idea why it leaked. It never has before.

The bonzai sketch in the right upper corner of the sketch above was a pen test to see how it was working after the spill. Oddly - fine.
So, overall, I would rate the evening as “so-so.”

Friday, December 9, 2011

Percy2 completed

 "Percy2" 12"x16" Neocolor II and Inktense pencils
on canvas board prepared with Daniel Smith watercolor ground.


Thursday, October 20, 2011

Percy2 update

While it is true that I seem to be moving steadily in many different directions lately, I haven't yet given up on this painting. But there's been so much going on! I tell you it feels like a whirlwind surrounding me each and every day! There's our new house to consider - it's about to close, my coloring book to promote, several holiday cards to complete, and what(!) I also seem to be making Kindle book covers! Not to mention working on several logos and editing old short story collections! Phew! But I am still working on "Percy2," albeit slowly.


It may take me a while to finish this one but it will get done. Maybe it'll even be the first piece I finish in our new house. Now wouldn't that be something?

Tuesday, October 11, 2011

Because who doesn't want a pony...?

I've been working on "Percy2" a bit sporadically this week. But here's the latest update. I have been adding layers of Neocolor II to the horse but have thus far left the background as an underpainting done in Inktense pencils.


Here's a close-up showing the smoothing process of the Neocolor II crayons with a q-tip.


I'm pleased with the amount of realism that I have been achieving with the crayons. Here's hoping the rest of the piece goes as well. :-)

Tuesday, October 4, 2011

Percy comes into further view

I have decided that this is a very fun piece! I've been working on it a bit further and am really enjoying the larger size (12"x16"). The DS watercolor ground-treated background is lending itself more to the brush than the q-tip thus far, but I expect to be using the q-tips more when I start adding Neocolor crayons pretty soon.

I've started adding the background
with dry Inktense pencils.


I've wet the top part of the background
and added dry Inktense to the bottom section.


At this point all the Inktense pencil has been wet
in the background and I've done some more
detailing on the horse's eye and the rest of
his face, also with Inktense.

Monday, October 3, 2011

Back to painting

Now that the coloring book is officially launched(!!!) I get back to painting while I promote it. For my newest piece I have returned to the world of Inktense/Neocolor II painting. This will be my second piece in these media, the first being my “Chickadee” which I finished over the Summer.

“Chickadee” was painted on Aquabord which I found to be quite a nice "toothy” surface to work with. For this piece (which has a working title of "Percy 2") I have treated a 12" x 16" piece of canvas board with Daniel Smith’s watercolor ground and am trying that out as a surface. So far so good, I think…but we’ll see how it holds up for the finished piece.

Here is the palette I have chosen.

Derwent Inktense pencils for the under painting: Fuchsia, Leaf Green, Beech Green, Oak, Sepia Ink, Bark, Willow, Saddle Brown.

Caran d'Ache Neocolor II for the over painting: White, Salmon, Pink, Mauve, Light Blue, Light Olive, Moss Green, Venetian Red, English Red, Cinnamon, Burnt Sienna, Sepia, Ochre, Light Ochre, Orangish Yellow, Light Beige, Mouse Grey, Dark Grey, Greyish Black, Payne’s Grey.

My palette

1. Here's the progress thus far. We start with the line drawing.

"Percy 2" part 1

2. Then add Inktense (still dry) to start the under painting.

"Percy 2" part 2

3. Here is the Inktense wet with brush and q-tip.


Now that it's officially on it's way, please check back and follow this piece's journey along with me. :-)

Wednesday, August 3, 2011

Even Cowgirls Sing the Blues


Ok, ok I haven’t been a cowgirl for some time. But “Even Dressage Riders Sing the Blues” just doesn’t have the same ring to it! So I’ve sprained my knee and am taking the week off to let it heal. Unfortunately, because the injury is to overworked flexor muscles, sitting at my drawing table doesn’t help. Instead I need to elevate it in extension. But I can draw with a board on my lap and that’s ok. But not for fine art. So it’s reading and resting for me for a few days. *sigh* I hope later in the week I’ll feel well enough to work on my coloring book. But we’ll see. So close and yet so far.

Thursday, July 28, 2011

Step-by-Step Inktense/Neocolor II Painting: “Chickadee”

One of my readers asked me to do a more in-depth description of the process I used to create my latest painting "Chickadee" in Inktense pencils and Neocolor II crayons. I hope that by sharing my process here I will encourage others to try out this fun technique too!

Picking tools
I have been fascinated by Inktense pencils since I first heard about them. I have been most pleased to see how well these ink pencils integrate seamlessly into ink artwork. Unfortunately, some of the Inktense colors aren’t very lightfast and to avoid fading I decided to choose the colors for my piece based on lightfastness ratings of 6 and above (on a scale of 1-8, 8 being the most lightfast.)

I have been taking an interest in water-soluble pencils and crayons recently and was curious to try using the Caran D’ache Neocolor II crayons in a fine art piece.

On one of my trips to Dick Blick's a while ago I picked up a small piece (8” x 8”) of Aquabord to experiment with. I liked the idea of using it here as the surface is rather rough and I thought it would work well to show the roughness of the tree bark in my picture.

Picking a palette
In starting a new piece my first step is always to choose a palette. Although I may add additional colors later on, I think it's best to do some planning before you start. Flying blind with color can lead to some awkward color passages and disharmonies later on.

I use hole-punched pieces of white watercolor paper (nice and heavy) to match little pieces of color in my reference photo with the Inktense and Neocolor II swatches in my swatch book.

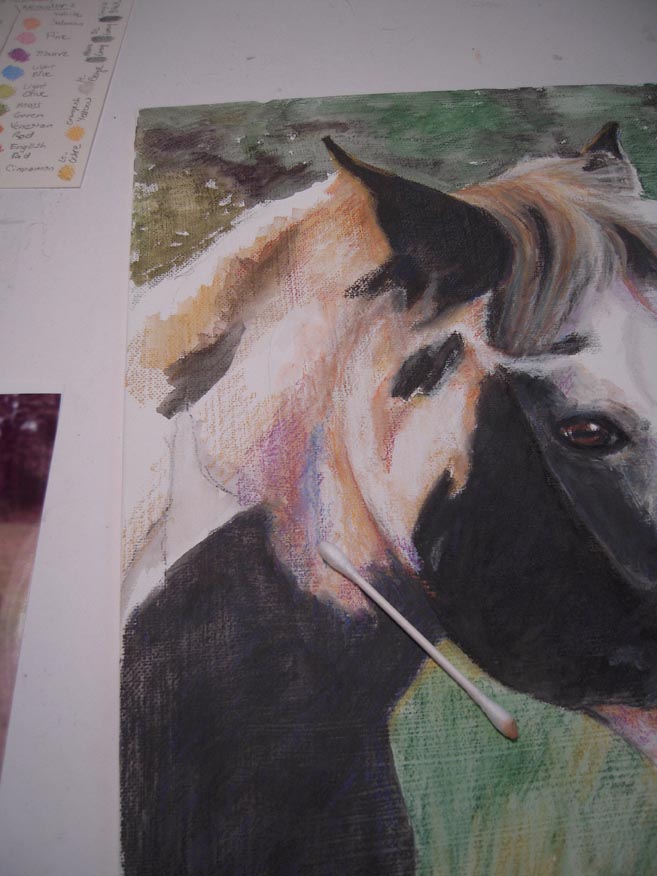
Once the palette is chosen I'm ready to start the piece. Here is a look at my workspace with palette swatches, brushes, a sponge, and q-tips for applying and softening color, pencil sharpener, Inktense pencils (in cup), mechanical pencil, and some of my Neocolor II crayons laid out and ready to go.

Here is the reference photo I chose to work with in this piece.
I used graphite transfer paper to transfer the basic image shapes to the Aquabord.

The Painting
To begin the painting I laid down color with Inktense pencils to create the out-of-focus background. After applying the color I smoothed it with q-tips wet with a moderate amount of water. The Inktense pencils create very bright colors that will be enhanced and softened by Neocolor crayons later on.

Here is the Chickadee with Neocolor II crayons added over the Inktense pencils in the background. Fairly opaque in nature, they helped create more variation and richness to the background as a whole. At this stage the background is nearly complete.

Next I began working on the darkest darks in the tree branches in the middle ground with Inktense pencils. I have also colored the bird’s eye for tonal reference. The eye will remain the darkest dark in the entire piece.

I have developed the branches a bit farther here and added a tiny bit of work on the bird itself. At this stage the colors you see in the middle and foreground are still in Inktense only. I have not yet started adding the Neocolor crayons to the branches.

Here we see the main branch completed after adding several layers of Neocolor II crayons. I have also started adding Neocolor to the other branches.

With more detail (Neocolor II) added to the other two major branches and a bit of color (Inktense) added to the bird, the painting is beginning to come together.

The piece is almost done now. Just the final details and some smoothing of the color is left to do. At this stage I like to leave the piece for a few days so that I can contemplate what still needs to be done after a break. Sometimes, I’ll turn the painting upside-down and look at it next to the reference photo (also upside-down) to see if the shapes and colors are matching well. Turning a piece upside-down can help remove your ego from your thought process and simply analyze the shapes and colors for accuracy.

Chickadee 8" x  8"
Neocolor II crayons and Inktense pencils on Aquabord
Well, here it is! The finished Chickadee painting. I am most pleased by how this new medium worked out for me. It was satisfying in both a tactile and a visual way. High marks for enjoyment!

Here are some close-up images from the painting: 

Close-up of the main branch

Close-up of the bird
I hope that this tutorial has been helpful and even inspiring. Creating this painting has certainly been the most fun I’ve had using crayons since the second grade! Why not try this technique yourself? If you do, I'd love to hear from you. And don't forget to send me a link too so I can see what you've created! If you liked seeing my step-by-step process here please let me know and I'll post more how-to's in this style in the future. :-)

Friday, July 22, 2011

Who says a crayon can't be used to create art? Chickadee finale

Chickadee 8"x 8"
Neocolor II crayons and Inktense pencils on Aquabord
Well, here it is! The Chickadee painting. I am most pleased by how this new medium worked out for me. It was satisfying in both a tactile and a visual way. High marks for enjoyment! I am looking forward to trying some other subjects in this style. I have a really good feeling about it. :-)

Here is the entire sequence of the piece from start to finish.

Cheers!

Wednesday, July 20, 2011

Chickadee Part 5


With more detail (Neocolor II) added to the other two major branches and a bit of color (Inktense) added to the bird, the painting is beginning to come together. I am really enjoying the play of Neocolor II crayons on the rough texture of the Aquabord. Together, they create a really nice, textural, harmony. :-)

Thursday, July 14, 2011

Chickadee Part 2


Here is the Chickadee with the background mostly completed. Since the last update, I've added Neocolor II crayons over the Inktense pencils in the background. This created more variation in color and a bit more richness to background as a whole.

At this point, I have just started working on the tree branches in the middle ground with Inktense pencils.