Showing posts with label chickadee. Show all posts

Monday, October 3, 2011

Back to painting

Now that the coloring book is officially launched(!!!) I get back to painting while I promote it. For my newest piece I have returned to the world of Inktense/Neocolor II painting. This will be my second piece in these media, the first being my “Chickadee” which I finished over the Summer.

“Chickadee” was painted on Aquabord which I found to be quite a nice "toothy” surface to work with. For this piece (which has a working title of "Percy 2") I have treated a 12" x 16" piece of canvas board with Daniel Smith’s watercolor ground and am trying that out as a surface. So far so good, I think…but we’ll see how it holds up for the finished piece.

Here is the palette I have chosen.

Derwent Inktense pencils for the under painting: Fuchsia, Leaf Green, Beech Green, Oak, Sepia Ink, Bark, Willow, Saddle Brown.

Caran d'Ache Neocolor II for the over painting: White, Salmon, Pink, Mauve, Light Blue, Light Olive, Moss Green, Venetian Red, English Red, Cinnamon, Burnt Sienna, Sepia, Ochre, Light Ochre, Orangish Yellow, Light Beige, Mouse Grey, Dark Grey, Greyish Black, Payne’s Grey.

My palette

1. Here's the progress thus far. We start with the line drawing.

"Percy 2" part 1

2. Then add Inktense (still dry) to start the under painting.

"Percy 2" part 2

3. Here is the Inktense wet with brush and q-tip.


Now that it's officially on it's way, please check back and follow this piece's journey along with me. :-)

Thursday, July 28, 2011

Step-by-Step Inktense/Neocolor II Painting: “Chickadee”

One of my readers asked me to do a more in-depth description of the process I used to create my latest painting "Chickadee" in Inktense pencils and Neocolor II crayons. I hope that by sharing my process here I will encourage others to try out this fun technique too!

Picking tools
I have been fascinated by Inktense pencils since I first heard about them. I have been most pleased to see how well these ink pencils integrate seamlessly into ink artwork. Unfortunately, some of the Inktense colors aren’t very lightfast and to avoid fading I decided to choose the colors for my piece based on lightfastness ratings of 6 and above (on a scale of 1-8, 8 being the most lightfast.)

I have been taking an interest in water-soluble pencils and crayons recently and was curious to try using the Caran D’ache Neocolor II crayons in a fine art piece.

On one of my trips to Dick Blick's a while ago I picked up a small piece (8” x 8”) of Aquabord to experiment with. I liked the idea of using it here as the surface is rather rough and I thought it would work well to show the roughness of the tree bark in my picture.

Picking a palette
In starting a new piece my first step is always to choose a palette. Although I may add additional colors later on, I think it's best to do some planning before you start. Flying blind with color can lead to some awkward color passages and disharmonies later on.

I use hole-punched pieces of white watercolor paper (nice and heavy) to match little pieces of color in my reference photo with the Inktense and Neocolor II swatches in my swatch book.

Once the palette is chosen I'm ready to start the piece. Here is a look at my workspace with palette swatches, brushes, a sponge, and q-tips for applying and softening color, pencil sharpener, Inktense pencils (in cup), mechanical pencil, and some of my Neocolor II crayons laid out and ready to go.

Here is the reference photo I chose to work with in this piece.
I used graphite transfer paper to transfer the basic image shapes to the Aquabord.

The Painting
To begin the painting I laid down color with Inktense pencils to create the out-of-focus background. After applying the color I smoothed it with q-tips wet with a moderate amount of water. The Inktense pencils create very bright colors that will be enhanced and softened by Neocolor crayons later on.

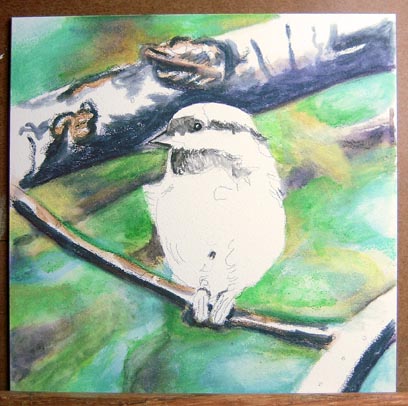
Here is the Chickadee with Neocolor II crayons added over the Inktense pencils in the background. Fairly opaque in nature, they helped create more variation and richness to the background as a whole. At this stage the background is nearly complete.

Next I began working on the darkest darks in the tree branches in the middle ground with Inktense pencils. I have also colored the bird’s eye for tonal reference. The eye will remain the darkest dark in the entire piece.

I have developed the branches a bit farther here and added a tiny bit of work on the bird itself. At this stage the colors you see in the middle and foreground are still in Inktense only. I have not yet started adding the Neocolor crayons to the branches.

Here we see the main branch completed after adding several layers of Neocolor II crayons. I have also started adding Neocolor to the other branches.

With more detail (Neocolor II) added to the other two major branches and a bit of color (Inktense) added to the bird, the painting is beginning to come together.

The piece is almost done now. Just the final details and some smoothing of the color is left to do. At this stage I like to leave the piece for a few days so that I can contemplate what still needs to be done after a break. Sometimes, I’ll turn the painting upside-down and look at it next to the reference photo (also upside-down) to see if the shapes and colors are matching well. Turning a piece upside-down can help remove your ego from your thought process and simply analyze the shapes and colors for accuracy.

Chickadee 8" x  8"
Neocolor II crayons and Inktense pencils on Aquabord
Well, here it is! The finished Chickadee painting. I am most pleased by how this new medium worked out for me. It was satisfying in both a tactile and a visual way. High marks for enjoyment!

Here are some close-up images from the painting: 

Close-up of the main branch

Close-up of the bird
I hope that this tutorial has been helpful and even inspiring. Creating this painting has certainly been the most fun I’ve had using crayons since the second grade! Why not try this technique yourself? If you do, I'd love to hear from you. And don't forget to send me a link too so I can see what you've created! If you liked seeing my step-by-step process here please let me know and I'll post more how-to's in this style in the future. :-)

Friday, July 22, 2011

Who says a crayon can't be used to create art? Chickadee finale

Chickadee 8"x 8"
Neocolor II crayons and Inktense pencils on Aquabord
Well, here it is! The Chickadee painting. I am most pleased by how this new medium worked out for me. It was satisfying in both a tactile and a visual way. High marks for enjoyment! I am looking forward to trying some other subjects in this style. I have a really good feeling about it. :-)

Here is the entire sequence of the piece from start to finish.

Cheers!

Thursday, July 21, 2011

Wednesday, July 20, 2011

Chickadee Part 5


With more detail (Neocolor II) added to the other two major branches and a bit of color (Inktense) added to the bird, the painting is beginning to come together. I am really enjoying the play of Neocolor II crayons on the rough texture of the Aquabord. Together, they create a really nice, textural, harmony. :-)

Monday, July 18, 2011

Chickadee Part 4


The main branch is now looking much more complete after adding several layers of Neocolor II crayons. The Neocolor crayons are really lovely to work with, very tactile as only crayons (or maybe oil pastels) can be. For me this makes the layering process quite enjoyable!

Now to get working on the bird herself... ;-)

Friday, July 15, 2011

Chickadee Part 3

Here is the chickadee today with more development on the branches and a tiny bit of work on the bird itself. At this stage the colors you see in the middle and foreground are still the Inktense base. I have not yet started adding the Neocolor crayons. I will deliberately leave the bird's eye in Inktense only as I like the shininess of it.

Thursday, July 14, 2011

Chickadee Part 2


Here is the Chickadee with the background mostly completed. Since the last update, I've added Neocolor II crayons over the Inktense pencils in the background. This created more variation in color and a bit more richness to background as a whole.

At this point, I have just started working on the tree branches in the middle ground with Inktense pencils.

Wednesday, July 13, 2011

Yes, you can use q-tips and crayons for fine art! Chickadee Painting

I have recently started a new piece in Inktense pencils and Caran D’ache Neocolor II water-soluble crayons. What a delight! I took my cue from Mona Majorowicz and her Squidoo lenses about using Inktense with Neocolor II crayons in her wonderful animal paintings.

I simply had to give it a try! Although Mona frequently uses Suede Board as the support for her paintings, I decided to use Aquabord for my test piece. The Aquabord surface is quite rough and I felt this would be appropriate for the woody subject I had chosen.


In starting the piece the first step was to choose my palette. I used hole-punched pieces of white watercolor paper (nice and heavy) to match little pieces of color in my reference photo with the Inktense and Neocolor II swatches in my swatch book.


After choosing my palette, next I assembled my tools. Here is a picture of all the pieces laid out. And yes, those are q-tips. I quickly discovered that they were the best choice to smooth the Neocolor II crayons. Brushes work too but dilute the effect of the opaque crayons. On the rough surface, the crayons have been giving me really wonderful textural effects.


Here is stage one of the painting with the background laid in, mostly in Inktense pencils. The brightness of the Inktense provided a wonderful base for the Neocolor II crayons.

Please come by again and watch how the painting progresses. :-)